
I recently saw some requests for help with LVM for Linux on sysadmin forums. In my opinion, there were some clear gaps in the posters’ understanding of LVM architecture. So today I’ll give an overview of LVM’s basic components.
What is LVM?
First of all LVM stands for Logical Volume Manager. Chances are that your distro has it pre-installed – but if it not, LVM is reasonably straight-forward to install – refer to your distro’s documentation.
LVM is a toolset that we can use to put a bunch of storage devices into a group, and carve up the contents of that group into usable portions. Generally, we would then go on to create filesystems on those portions, or use them for swap (virtual memory).
The LVM implementation in Linux is related to the LVM implementation in HP-UX [1]. LVM is being used less and less these days with the availability of on-demand, scalable, ‘elastic’ cloud-based storage. However, at this point in time, there are still many home and enterprise Linux installations using LVM.
LVM has a bunch of powerful features, and you can do quite a lot with it. Today, we’re looking at its basic components only.
Physical Volumes (PVs)
At their very basic, Physical Volumes are storage devices attached or presented to a computer. These days in the enterprise computing world, these devices are likely to be virtual devices, but they look and feel like physical devices to the operating system. Before a disk can be used by LVM, it has to be initialised as a Physical Volume (PV). If you’re using the command-line, this is done using pvcreate. This process writes a label on the disk and initialises areas for LVM metadata.
A common misconception is that a disk device can be added directly to a Volume Group without initialising it as a PV first. Not so!
Volume Groups (VGs)
A Volume Group is a collection of Physical Volumes which is then divided up into Logical Volumes. Essentially VGs are a way of grouping together storage devices, so usable portions of storage can be carved out of them. If using the command line, Physical Volumes can be added to a new Volume Group using vgcreate, or added to an existing Volume Group using vgextend.
Logical Volumes (LVs)
A Logical Volume is a portion carved up out of a Volume Group that can be used by the operating system for data in some way. Typically, a Logical Volume will be used to create a filesystem. But not always. For example, a Logical Volume can be used as a swap device (for virtual memory).
From the command line, a Logical Volume can be created in a Volume Group using lvcreate, and have additional storage space added to it using lvextend. Both lvcreate and lvextend have options to specify which PV (or PVs) you wish to use.
Many types of Logical Volumes can be created. If LVM is installed, the help or man pages have a rundown on all the different kinds of LVs possible and the options that can be used with them.
Overview summary
Here are the ‘layers’ involved in a typical basic LVM implementation:

Note that:
- LVM doesn’t encapsulate existing devices or their data. So once a device (disk) has been initialized by LVM as a Physical Volume, any existing data on it is wiped.
- A system (server or your personal computer) can have more than one Volume Group. My example above was very basic, showing a system with a single VG.
- Just for the record, a Logical Volume can’t span Volume Groups.
- Logical Volumes can be grown online as long as there is space available in the Volume Group. Once an LV is grown though, a separate step would be required for the filesystem it contains to make use of the new space in the LV. Documentation on the filesystem’s type will state whether the filesystem can be grown or resized, and whether this is possible to be done online.
- Existing Volume Groups can be imported or exported to or from the operating system of a computer. This comes in handy when the storage in a Volume Group needs to be detached from one computer and moved to another.
- High-availability add-on options are available that allow Volume Groups to be shared between clustered servers.
Summary of the process
The diagram below shows the steps for creating a basic Volume Group and Logical Volumes.
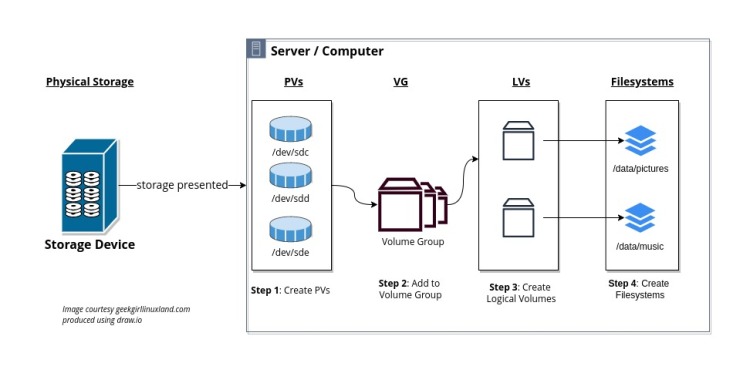
If you couldn’t see the image above, the steps are reproduced below. First, ensure storage is presented to and visible from the operating system. Then:
- Create and initialise physical volume(s).
- Create volume group.
- Create logical volume(s)
- Finally prepare logical volume(s) for use. For example, by creating filesystem(s) or adding as swap volume(s).
To find out more
- Documentation that comes (or should come) with your distro – generally accessed using ‘<command> –help’ or ‘man <command>’.
- This article from Opensource.com – a bit old but still relevant.
- If you are a sysadmin looking for Red Hat’s LVM documentation, their overview of LVM management is a good starting point.
- Fedora has a guide to understanding LVM.
- Ubuntu has a Wiki on LVM.
- You can also head to LVM’s home page.
What do you think of LVM? Feel free to leave a comment below. I’d also love to hear of your experience using other volume management systems.
References
[1] D. Teigland, H. Mauelshagen, Volume Managers in Linux, (2001). https://www.usenix.org/legacy/event/usenix01/freenix01/full_papers/teigland/teigland_html/ (accessed August 7, 2022).
Featured image by panumas nikhomkhai from Pexels.com.

Second time reading it…great stuff, as usual. Enterprise jargon can make my head spin, especially when that jargon starts talking about other jargons at the same time. 😉 I have heard of LVM ‘n PVs but VGs looks new to me.
On most of my machines that get regular use I have various kinds of SATA Hot Swap Bays (like Icy Dock ‘n Kingwin 2×2.5″ SATA Tray-less types)…go in the exterior case bays. No internal drives on most of my computers, except for 2 laptops and a small-small frame build. That way I test OSs without other OSes interfering. Main computer has 4 swap bays wid my Win11 Pro in one ‘n main Data drive in another. That is enough drives for me! 😉
Permanent Linux OSes I have on SanDisk or Samsung USB’s, but conduct Linux OS tests on SSDs mostly. If I like ’em they go to USBs.
Geez, your diagrams/charts are excellent! You obviously like draw.io ‘n you make it look good. Guess that app is for the clouds because I saw no download options for it. Makes the LVM ‘n PVs ‘n VGs ‘n physical storage jargon easier to understand.
LikeLiked by 1 person
Thank you Karmi, I really appreciate your insights! Excellent point about enterprise jargon. It prompted me to re-read the post, and I’ll be making a couple of changes to it!
Hey, when you test-drive a Linux distro, do you let the install pick a default volume management and filesystem layout?
And yep, draw.io can be used in the cloud, entirely online: https://app.diagrams.net/. But I opted to install the rpm onto my Fedora laptop from GitHub (https://github.com/jgraph/drawio-desktop/). It looks and feels like Microsoft Visio to me, and has tons of shapes included which is great for networking diagrams.
LikeLiked by 1 person
Geez…must’ve missed the email wid your reply here?!
Usually let the Distro choose how it wants to handle partitions ‘n formatting; however, a lot that I test (e.g. Sparky Advanced Installer) it can be easier if the drive is prepped in advance. Some like Porteus let you do all kinds of formats ‘n partitioning. If it’s left to me, I’m a fat32 with a large ext4 helping man! 😉
I bookmarked that github link in case I give installing that a try…
LikeLiked by 1 person